The Kerr military target rifle, like the Turner and Whitworth, presents a unique set of problems when it comes to proper stocking up. Barrel bands, instead of keys, and a bolster that runs back into the lockplate instead of lying above it. When I first installed the barrel in my Kerr, I followed Bill Curtis’ instructions from Research Press titled Managing the Enfield. It is an excellent article and well worth reading if you have a military stocked rifle. You can read the article here, Managing the Enfield.
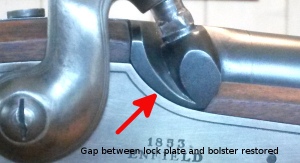
In the section on bedding, Bill recommends using paper shims to gain the proper fit and that is what I did prior to Oak Ridge last year. I was happy with the results, but after time the shims compressed and I found interference had begun between the barrel bolster and the lock plate. This was something Bill warned against as it was detrimental to accuracy. Upon removing the barrel recently, I saw a shiny mark on the lock plate and a corresponding mark on the bottom of the bolster. This had to be fixed.
Now, keep in mind extensive re-bedding is not normally needed for a rifle. My Kerr is a Parker Hale P53 with an aftermarket barrel. While the barrel maker was provided with the dimensions of my .577 caliber barrel, the odds of an absolutely perfect drop in fit were slim. A well made rifle would normally have the barrel properly fitted by a competent gunmaker and little of what I am about to do would be necessary.
I removed the barrel and began adding new paper shims until I achieved the clearance Bill recommends. The bolster was clear of the lockplate and the barrel band would just slip on the stock. The fit was tested by inserting a very thin paper between the barrel and the stock at each of the barrel bands providing a slip fit. When the barrel bands were tightened, the paper could still be removed, but you had to snap it out. A quick jerk of the paper allowed it to release without tearing when the proper amount of shim was installed. That is clearly not a scientific way to check barrel band tension. However, I do not know another way and everything I read recommends that barrel bands should be “snug”, “lightly tightened”, or other impossible to duplicate values. Having the bands hold the barrel tight enough to trap the paper, but not hold it, seemed right to me.
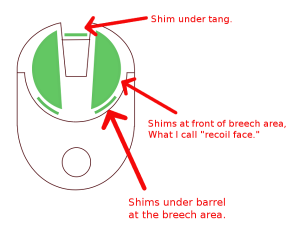
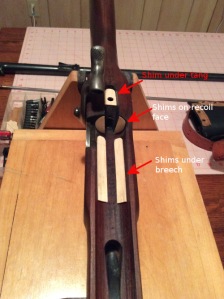
Once the barrel was resting correctly in the barrel channel, I started adding shims under the tang until I could tighten the tang screw and the muzzle of the barrel would not lift. That showed the tang was properly supported in the stock and tightening the tang screw would not apply undue tension to the breech.
When I had that completed, I then looked at the breech area and found I had a gap between the rear of the breech, what I am calling the recoil face, and the stock. This was measured, shimmed, and tested for a tight fit. I wanted that surface to be in 100% contact and tight, as that is the place the barrel will recoil back into.
When I was happy that I had found the right amount of shim, and placed them into the right areas, I removed the paper shims and installed hardwood veneer with Elmer’s School glue. Again, checking the fit along the way. The barrel was installed and everything allowed to dry.
In order to achieve the fit Bill recommends, I required different thickness of shims in the stock under each barrel band. The shims were placed on each side of the barrel channel, acting like Vee blocks to center the barrel in the channel, and provide two points of contact.
Let’s look at some line drawings that better show how I placed the shims in the stock. The green lines represent the shims.

Side view of shim placement within the barrel channel. Imagine a slice through the center of the rifle. The barrel is shown sightly lifted from the stock to better show the shim placement. Click the image to open a larger view in a new tab.

View of shim placement from front of stock. The shims are shown raised off the stock to make them more visible. Click the image to open a larger view in a new tab.
When everything was in place, I had the desired tension in the barrel bands holding the barrel in place, a tight fit with no gaps at the recoil face of the breech, and my lockplate was just clear of the bolster.
I have not applied any finish or treatment to the shims at this point. I will be shooting the Kerr to test bullet fit soon and I want to see what impressions are left on the shims after recoil forces are applied to the stock. If everything looks good and the barrel shows equal tension in the stock, I will apply something suitable to keep moisture out of the veneer shims. Shellac is a favorite of mine, or melted beeswax, both allow easy removal of the shims for future maintenance of the bedding.
How will I know if this is an improvement? Ideally I should see consistent round groups when I do my part as the shooter. If the rifle throws flyers, or the groups string, I will know the barrel is shifting within the stock. I will also check to see if one shim is feeling more pressure than the others by looking for black marks or compression. If I see that, light sanding will remove the tight spots and allow the barrel to rest properly in the stock.
Is all this really necessary? When teaching new students in three position rifle we would commonly see groups expand as the day wore on. More often than not, simply going down the firing line and checking stock screws in the afternoon we would discover many had loosened during the morning. Re-torquing the stock screws would tighten the student’s groups, sometimes to an amazing degree.
It matters.


Pingback: Bedding the Military Target Rifle, Part Two | vring