
If you have not read my first post on paper patching bullets, you should do that now because I will not be recovering the details of how I cut and wrap my patches. Please read part one for that information.
Paper Patching Pullets Part I seems to be the most popular thing I have written to date. WordPress says that it has been read over 2,300 times in the past four years. That is, of course, a week’s worth of views on almost any other internet blog. But, I do not advertise or actively look for readers as this blog exists only to keep a few friends updated on my progress. So, for all the forum posters and bloggers who have pointed to my articles, thank you. I hope you have found them useful.
Since writing that post, I have changed several things in my paper patching routine and I think some of you may find it interesting. I have changed how I manage the patch at the base of the bullet and how I manage the final size of the patched bullet.
Previously, I have always used a twisted tail when paper patching and I have become comfortable with that method. However, a twisted tail can bring up some complications when using a pure lead bullet. My previous experience, prior to LRML, has been with copper jacketed bullets or very hard cast bullets. Both of those bullets are not picky about how the patch is secured to the end of the bullet because the bullet material is harder than the paper. Unfortunately, when patching a flat based pure lead bullet with a twisted tail, I was creating a problem.
At Oak Ridge this year, I had two calls from the pits that my bullets where buzzing as they flew over the target butts. That is generally a sign that the bullets are out of balance or tumbling because they flew short and had skipped off the berm. I knew my shot was good, I knew my elevation was good, and the following shots each cut paper. Those pit calls stayed in the back of my mind after the event. Maybe I lost some sleep over it. I’m not admitting anything.
Noting that I was also still seeing the odd flyer during practice as well, I began collecting paper patch material after shooting and checking for signs of patch failure. Not seeing a problem with the patch during loading or shooting, I next began to look at how I was casting and assembling bullets prior to shooting.
If you remember, in part one, I said I was sizing my bullets to .442 prior to patching and the addition of the paper patch brought my final bullet dimension up to .448. In my search for consistency, I began patching the bullets unsized and then sizing them to .448. I found that sizing the bullet after patching gave me a more uniform patch and burnished the paper providing a better fit to the bore. That is all true, and accuracy did improve, but I still got flyers.
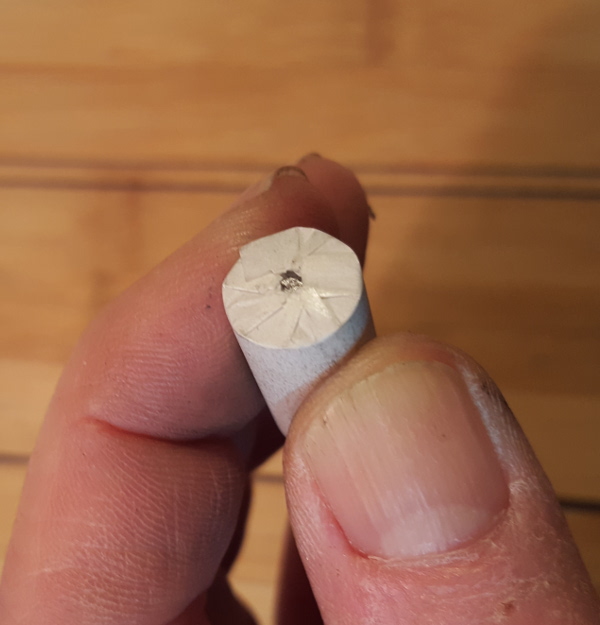
On a whim, I took a box of bullets I had used recently and peeled the paper patch off the first bullet. I found an impression on the base of the bullet where the twisted part of the tail was pushed into the base during the sizing operation. I frantically began unwrapping all the bullets in the box looking for problems with the base. Then I found this.

Does that look centered to you?
Unwrapping all forty-five bullets in the box, I found three more just like the one in the picture. It appears to me that the ram that pushes the bullet through the sizing die was pressing the twisted tail of the patch up into the bullet’s base. If the twisted tail was not perfectly centered on the base when the bullet was sized, it created a bullet that was out of balance. Could that cause a flyer? I think it certainly could considering that my bullets are 540 grains of lead spinning at over 45,000 RPM!
Muzzle Velocity X 720 / Twist Rate = Bullet RPM

1270 x 720 / 20 = 45,720
After that discovery, I remelted all the bullets I had and recast them. Once inspected and sorted by weight, I patched them using a folded tail rather than a twisted tail and sized them after patching. That change ensured the base of the bullet was flat and the result was my odd flyers went away. I love it when I find a problem and then create a solution. I feel like I know what I am doing.
Sizing the bullet after patching has provided me with several other benefits. I already mentioned that sizing the bullet after patching burnishes the surface of the paper, helping the patched bullet to go down the bore during loading with less chance of the patch coming off. Also, the burnished patch seems to hold up to handling better as I have not had any loose patches since. Finally, I noticed that the sizing ram is creating a well formed and flat bullet base when pushing the patched bullet through the sizer.
A nice flat bullet base and the patch tightly closed.
There is one more thing worth mentioning. With the bullet unsized it measures .443 and with the addition of the paper patch, it measures .450. Once passed through the .448 sizing die, the bullet itself is swaged down .0005. More than just the paper patch is being sized.
As cast, the bullets measure .443.

Bullet as cast – .443
Once the bullets have been patched and sized, they measure .448, as they should.

Patched and sized – .448
But, if you remove the patch and measure the bullet again, you will see that the bullet was reduced .0005 during the sizing operation. The paper patch could not compress enough on it’s own, some of the sizing force was taken by the bullet.

Bullet after sizing – .442
I do not know if that is important or not, but it is better to know it now, then to be searching for it later.
Sharp eyed readers will notice that the bullets in the pictures above are not the bullets I have been using with the Whitworth. They are a bullet designed by Brent Danielson and the nose design is called a “prolate”, although Buffalo Arms catalogs it as “Eliptical”. The bullet mold is available through Buffalo Arms and you can find it here. I have changed bullet designs because I am changing rifles, again. What rifle and why, is a topic for another post. Hopefully soon, if the weather cooperates and I can get to the range.

Brent Danielson Prolate Bullets
Here is something I think is worth noting when casting any bullet, not just paper patched bullets. When the mold for the new bullet arrived, the first thing I did was read the packaging of course, doesn’t everyone? Buffalo Arms says in their instructions to never hit the sprue plate with a hammer or wooden stick. I have always used an old hammer handle to hit the sprue plate and cut the sprue. That is how I was taught over 40 years ago. They recommend using your gloved hand. I thought that was about the silliest thing I ever heard. They know that the sprue plate gets hot, right? In the interest of science and learning new things, I decided I would not hit the sprue plate with my hammer handle and see what benefit, if any, I got for my effort. I was not going to use my gloved hand either, a better way had to be found.
My solution was to make a lever for the sprue plate, something that I could use without burning through my gloves or making a permanent change to the mold block. What I came up with was a simple lever made from some junk steel bar. I added two allen head screws that would trap the sprue plate lever and allow me to cut the sprue without hitting the mold and without burning my hands.
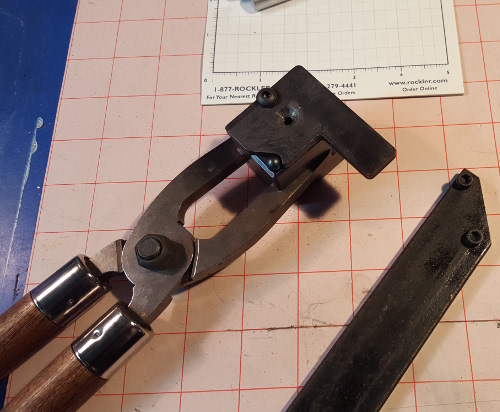
Sprue lever and mold blocks
Looking at the picture above, imagine flipping over the bar stock on the right and trapping the sprue lever between the two screw heads. Then you need only push the sprue plate aside to cut the sprue. Easy as pie. With a bit of trial and error using a piece of wood and cold mold blocks, I was able to find the right position for the screws so that the lever would work with all of my molds.
After a single casting session using the sprue lever, I have to admit it is better. It has to be easier on the sprue plate to not be smacking it all the time and I feel like I am getting a smoother cut of the sprue. Adding that one step to casting is not a problem, as I have to wait for the sprue puddle to cool. During that time, I return the ladle to the lead pot and pick up the sprue lever.
As I was using the lever while casting this past weekend, my mind was already thinking of improvements I could make to gain a more comfortable angle on the lever. I will undoubtedly make a better lever soon and I don’t think I will ever smack another sprue plate again.


Pingback: Paper Patching Bullets | vring
Pingback: A new rifle and a new bullet. | vring